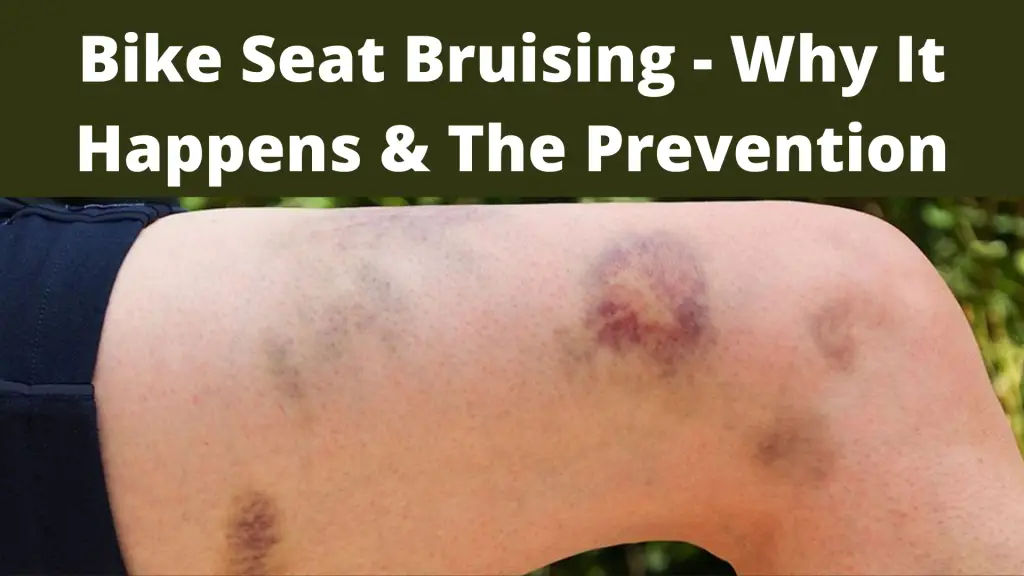
Rockshox Seatpost can be a pain sometimes. Especially when you don’t know what went wrong with your brand-new dropper or Seatpost!
I know you might be feeling frustrated with your Rockshox reverb.
So, why does the RockShox reverb stuck down occur?
There are many reasons for RockShox reverb stuck down issues such as bleeding, air pressure, etc. Even your oil leak or IFP seal issue can be a culprit that can constantly drop your Seatpost down. However, all of these problems can be fixed with proper troubleshooting techniques.
I think you’ll want to know about the possible fixes, right? If that’s the case, come along with me as I go through everything major aspects of the Rockshox reverb Seatpost!
What Goes Inside the RockShox Reverb?
Being one of the best fork companies in the market, Rockshox does deliver excellent quality. That’s even more true when you’re buying from the premium category. Rockshox reverb falls into the almost premium segment.
Now, it’s a common thing for Seatpost to get air and oil inside it. The same goes for rever as it uses a floating piston for separation with the air chamber. And the oil column stays below the chamber.
The oil column is adjusted to support the rider and to maintain proper height. But the rider often puts stress on it by adding the full weight. On such occasions, the weight makes the oil into a solid shaft and the control valve gets shut.
The problem with air-oil mix arises when the air slips into the column. Your fork leaking oil issue can make your post feel like a spring. Even your o-rings seal can get affected!
However, the all-new Rockshox reverb valve technology addresses it quite brilliantly. Rockshox is constantly updating its side loads and o-ring seals. The valves are now easier to disassemble and compress your post. Also, you get a rockshox reverb bleed kit with it.
But the sad thing is you still might face stuck-down issues with all these technologies. So, why does it happen? Come with me as I unfold the mysteries!
Why Does RockShox Reverb Jammed Issue Occur?
There can be a number of reasons why you might face stuck-down issues. It can be due to the improper bleeding of your dropper or the air pressure. Again, if you know about the IFP seal, you might want to check that as well.
I know it can be quite daunting to check them all at once. That’s why I’ll go through all the reasons one by one! That way, it’ll feel easier for you to follow. So, let’s start with the most common reason of all.
Reason 1: Bleeding Issue
Whenever I hear about the seatposts problem, this is the first thing that comes to my mind. Because it’s very easy for riders to get it wrong and then suffer. I know it’s annoying and it gets worse as time goes by.
So, what’s the first that you should do when your rockshox reverb is stuck down cold? Well, bleed the hell out of it! I mean don’t get all offensive with it but try to be as careful as possible.
If you don’t know how to bleed it properly, don’t worry. I have you covered!
Solution
Before you bleed your reverb, you need to have some tools. Although you might get them in your bleed kit, make sure to have everything. Here are some great bleed kits I’ve found while searching through Amazon-


To start bleeding, extend your dropper and adjust the height of your actuator. Make sure it rests on top. Take out the mounting bolt and adjust the position of the actuator at the highest. Turn the adjuster to the minimum level and fill up ¾ of one syringe.
Push the plunger to draw away any air bubbles from the inside. Remove the bleed screw and insert the full syringe.
After that, carefully remove any air present in your syringe. You can do that by putting the syringe upright and pulling the plunger.
Now, take your full syringe and tap to remove any air bubbles. Then, put it inside the system and make sure the fluid flows thoroughly into the system. Be very careful not to leave any air flowing inside the plunger.
When you can surely confirm that, press the whole seat post side and unscrew.
Holding the syringe up, again push the plunger to draw the air out. Bring the actuator to its resting position by pressing it while pulling the plunger from the syringe. Do the process 5 to 10 times to ensure no gaps or air bubbles.
Turn the adjuster from fast to slow three times. Then, revert it back to the fast (or +) position. Push the plunger and dial the adjuster to slow position. Now, apply pressure to your syringe and steadily take it to the extended position. Finally, unscrew your syringe and revert to the bleeding port screw.
Give the whole system a nice cleaning and you’re finally done!
Reason 2: IFP Seal & Lever Clamp
You might not be aware of it but the issue can be related to your IFP seal. That particular seal can overwhelmingly drag your RockShox reverb down. On top of your IFP seal issue, the lever clamp can be a culprit too.
If both of these components are not acting normally, then you have to know the fix!
So, do check out this RockShox reverb Seatpost troubleshooting method!
Solution
In terms of the IFP seal issue, there’s nothing you can do rather replace it. I know it’s tough to swallow but that’s the only way to solve this.
You might need extra tools to resolve everything. As it’s a PIA, you have to encounter some difficulties. As for clamp level, check the torque at first.
If you notice any stiffness, try to loosen it up a bit. Then push the level and check whether the Seatpost seems okay. Because of the clamp’s sensitivity, you have to be consistent. Otherwise, they act weird all the time.
So, try to follow the above to get solve your dropper issue. However, if that does not solve it, don’t get stressed out! Because there is one last thing to check!
Reason 3: Air Pressure
Sometimes, the air pressure can get a little weird with your dropper. Many have suggested that when they dropped the air pressure the seat worked fine. So, the rockshox reverb air pressure can be a significant issue if you’re not careful enough.
Along with air pressure, you might want to check your fork oil too. I know they are not exactly related but a good fork oil substitute can improve your bike feel. So, try to keep a watchful eye on that too!
Solution
Air pressure can’t be solved with just bleeding. You have to go a little further. First, every inch of air has been drained out from the Seatpost.
Then, use any good tape to hold the lever and adjust. After that, pull the lower shaft upright and extend the dropper to its maximum height.
Once you extend the post, pump the air adequately and release the level. After you’re done with everything, do the bleeding again.
So, those are the most prevalent problems and solutions regarding reverb stuck down. Now, even if your rockshox reverb starts to act weird, you’ll know where to start!
FAQs
How Do You Pump Air into RockShox Reverb?
To pump air into your reverb, first, take out the saddle. Make your you undo both clamp bolts of your saddle. After that, disassemble the valve cap. While at it, clean the clamp and the caps thoroughly. Now, bring the air pressure to 250psi. Then put everything together and you’re done.
How Do I Speed up RockShox Reverb?
You have to push the level down if you want to speed up your Rockshox reverb. After taking it all the way, apply pressure to the plunger. Use the paddle to cycle back and forth. Wrap up the process by pressing on the plunger again. The whole process should make the response faster.
Why is My Dropper Post Slow?
The dropper post slowing down issue is caused by tension. If you notice your post slowing down, you can put a little pressure on the cable. You can do that by adjusting the barrel anticlockwise. However, if the level is not getting pressed, then you might need to remove some pressure.
Conclusion
So, that wraps up the whole rockshox reverb stuck down discussion. I hope you won’t have to face that annoying problem again.
But you may face other issues regarding your dropper post. That’s why maintenance is a must if you want to stay trouble-free!